


Table of contents
- What are we going to build?
- What is redux and why use it?
- Redux terminologies
- Lets code
- 1. First Initialize the project
- 2. Install the redux toolkit in the project
- 3. Make a redux store file
- 4. Wrap the app with the redux provider
- 5. Make a Slice file
- 6. Add the reducer to the redux store
- 7. All set! Now use the redux state in the web app
- Woo hoo🥳! Now you know how to use Redux inside your NextJs application
- Bonus Tips
What are we going to build?
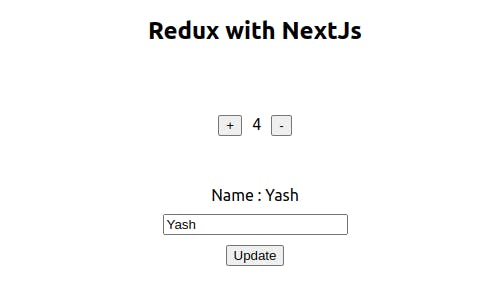
We are going to build a Nextjs application, with a counter and name field. The counter will increment and decrement when clicked on the '+' and '-' button respectively. And the name of the field is going to change when we click 'update' after typing a new name in the input field.
For the state changes of the counter value and name value, we are going to use the Redux Toolkit.
Redux Toolkit makes it easier to work with Redux. It provides a more streamlined approach to building Redux applications and also reduces a lot of boilerplate code.
What is redux and why use it?
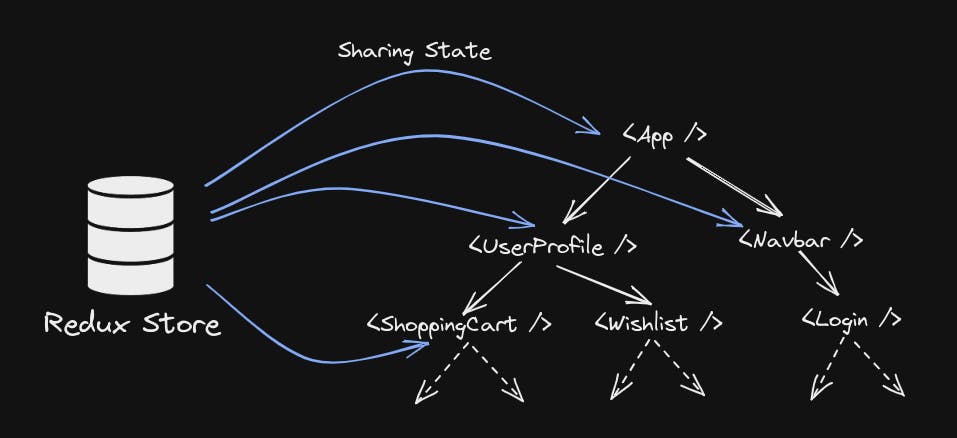
In simple words, redux is a javascript library, which helps to manage state(data in our project) in our react application. State management might not seem like a big issue in a smaller project, but when we are building a bigger project like an e-commerce website, state management becomes crucial and that's where redux comes to help.
Redux provides a central place (called redux store) to store and access the state of the application.
Redux terminologies
Store
Store in redux is essentially a JavaScript object that stores the entire state of the application.
Actions
Understand actions as javascript objects that represent events that occur in your application.
For example, In our application when the '+' button is clicked, the
incrementaction is called/dispatched.So basically actions tell us which event is triggered.
Reducers
Actions tell us which event is triggered, but how will that event change the state of the application depends on reducers.
Reducers are functions that are responsible for making changes to the state. Reducers tell us how our state is going to change.
For example, In our case when the '+' button is clicked, the action name
incrementis dispatched, and after this corresponding reducer is called, which defines the logic that the value should be increased by 1.In case reducers are still confusing you, understand that they're functions that update the application state. You will get more clarity as we go to code.
Lets code
1. First Initialize the project
npx create-next-app@latest demo-nextjs-redux
2. Install the redux toolkit in the project
Redux Toolkit makes it easier to work with Redux. It provides a more streamlined approach to building Redux applications and also reduces a lot of boilerplate code.
npm install @reduxjs/toolkit react-redux
3. Make a redux store file
First, we will make a folder named state in the outer part of our project. This folder will contain all the files related to redux in it. Then create a store.js file inside this folder. This file will contain our redux store.
Now, let's put some code in this. Right now it's empty and doesn't contain much meaningful code, but we will add some reducers to this in a further part of the blog.
import { configureStore } from '@reduxjs/toolkit'

export const store = configureStore({
  reducer: {}
})
4. Wrap the app with the redux provider
In the pages/_app.js we will wrap the app with the redux provider and pass the store that we created in the previous step as a prop.
This way we will be able to access our state in any component of the application.
import '@/styles/globals.css'
import { store } from '../state/store'
import { Provider } from 'react-redux'

export default function App({ Component, pageProps }) {
  return (
    <Provider store={store}>
      <Component {...pageProps} />
    </Provider>
  )
}
5. Make a Slice file
In redux, Slice file contains the reducers, actions, and other redux-related logic.
Inside the slice file, we will create a slice object that must contain the following things
a. A unique name for the slice
b. initialstate of the application
c. reducers object containing reducer functions responsible for the state change of the application
import { createSlice } from '@reduxjs/toolkit'

// intitial state of the application
// for our project, counter value is intially 0 and name value is empty string
const initialState = {
  value: 0,
  name:""
}

// creating a slice
export const stateDemo = createSlice({
  name: 'statedemo',    // this name should be unique to each slice, we will using it in store.js
  initialState,         // initial state
  reducers: {
    increment: (state) => {       //increment reducer
      state.value += 1
    },
    decrement: (state) => {       //decrement reducer
      state.value -= 1
    },
    updateName: (state, action) => {  //updateName reducer
      state.name = action.payload
    },
  },
})

// redux toolkit automatically make actions correspondind to each reducer
export const { increment, decrement, updateName } = stateDemo.actions

export default stateDemo.reducer
Each reducer function should contain at least one parameter, state. This state parameter represents the current state of the application. The second optional parameter is action. This action parameter will contain a payload. This payload will have the variables that we will send when dispatching an action.
For example, In our application, we send the new name that the user typed as the payload and assign the state.name as the action.payload, which contains the new name that the user typed.
6. Add the reducer to the redux store
Remember the empty store we created in step-3, now give all the reducers that we created in the reducer object inside store. In our case, we only have a single reducer.
Note: The key of the reducer should be exactly the same as the unique name of the reducer, that we are assigning it to.
import { configureStore } from '@reduxjs/toolkit'
// import our reducer from slice file
import demoReducer from './stateDemoSlice'


export const store = configureStore({
  reducer: {
    statedemo:demoReducer      // key of the reducer should be exactly same as the name of the reducer, that we are assigning it to
  },
})
7. All set! Now use the redux state in the web app
To get the state, we will use useSelector hook and to dispatch actions we will use useDispatch hook.
import Head from 'next/head'
import { useSelector, useDispatch } from 'react-redux'
// import actions from the slice files
import { decrement, increment, updateName } from '../state/stateDemoSlice'

export default function Home() {

  // getting counter value and name from the state
  const count = useSelector((state) => state.statedemo.value)
  const name = useSelector((state) => state.statedemo.name)
  const dispatch = useDispatch()

  return (
    <>
      <Head>
        <title>Redux Demo</title>
        <meta name="description" content="Generated by create next app" />
        <meta name="viewport" content="width=device-width, initial-scale=1" />
        <link rel="icon" href="/favicon.ico" />
      </Head>

      <main id="main">
      <h2>Redux with NextJs</h2>
        <div id="counter-cont">
           {/* Dispatching increment action, which will call increment reducer */}
          <button onClick={()=>dispatch(increment())}>+</button>
          <span>{count}</span>
          <button onClick={()=>dispatch(decrement())}>-</button>
        </div>

        <div id="name-cont">
          <span>Name : {name}</span>
          <input type="text" placeholder="name" />
          {/* Dispatching updateName action with a payload */}
          <button onClick={()=>dispatch(updateName(document.querySelector('input').value))}>Update</button>
        </div>
      </main>
    </>
  )
}
Woo hoo🥳! Now you know how to use Redux inside your NextJs application
Bonus Tips
Use the browser extension Redux Devtools (https://chrome.google.com/webstore/detail/redux-devtools/lmhkpmbekcpmknklioeibfkpmmfibljd)
It is very useful and helps is visualizing the state of the application and how the state is changing.

Use redux toolkit documentation. It is very detailed and beginner friendly.