Overview
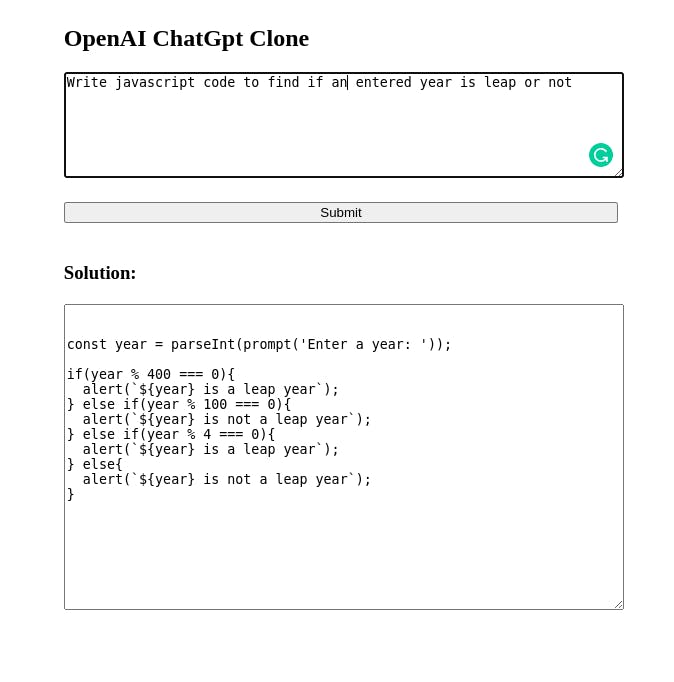
We are going to build a ChatGpt clone that uses OpenAI API for generating results from the given prompt. The final website will be very simple in design and easy to make. The screenshot for the final product is given below.

Screen shot of the final working website
Approach to making the website
1. Structure of Project
We will have 2 main parts to the project
a) Frontend: Made with only VanillaJs
b) Backend: Made with NodeJs and ExpressJs
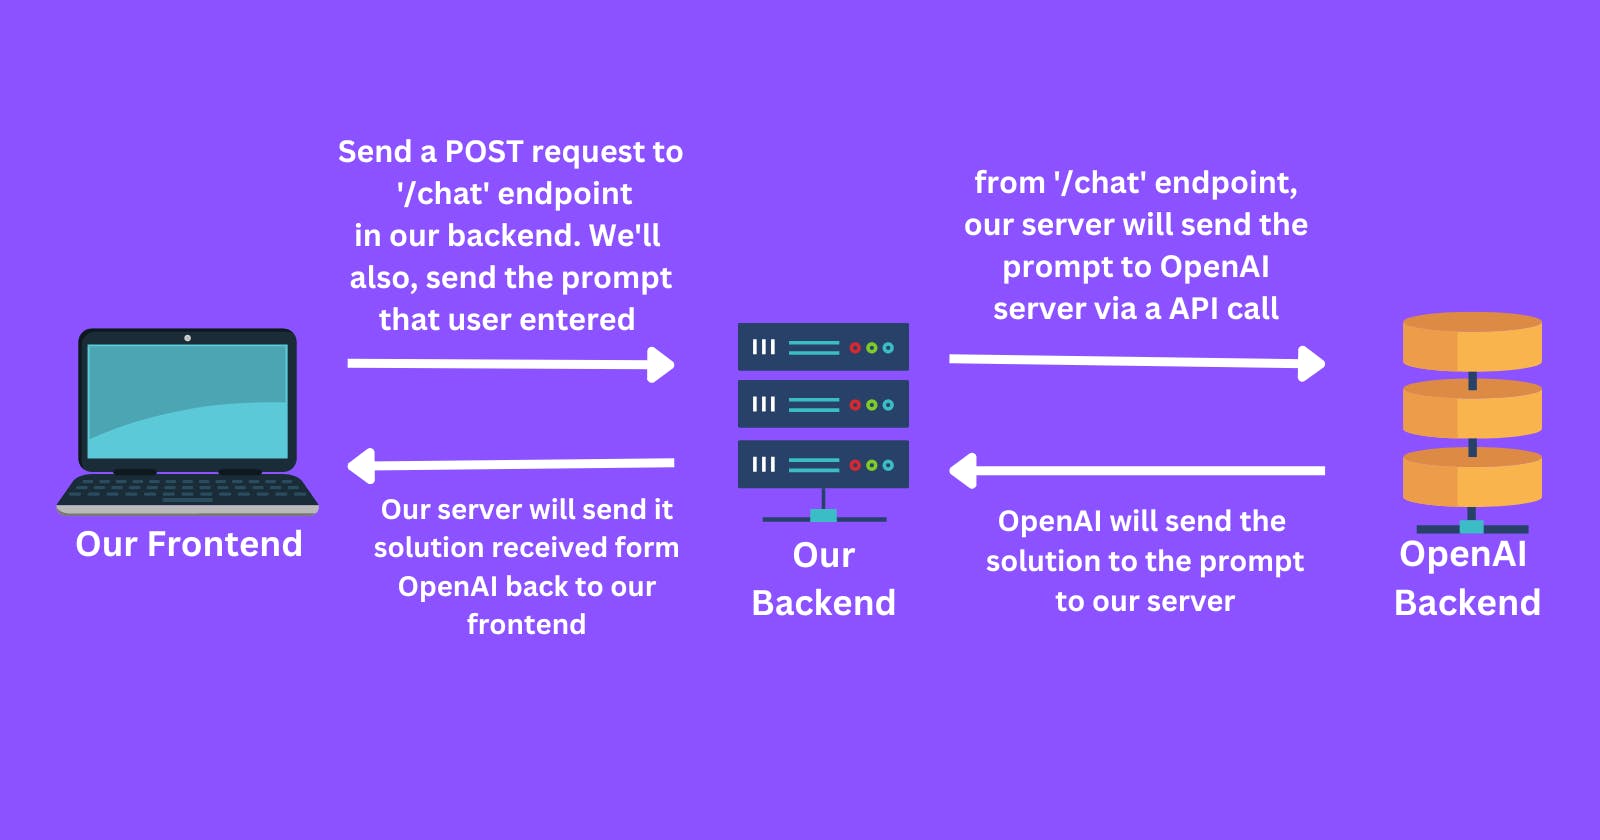
2. How will the website work

Code
Frontend
Initialize a VanillaJs frontend using Vite
Use the following command for initializing the project
npm create vite@latest chatgpt-clone -- --template vueWrite the HTML and CSS required
 <!DOCTYPE html>
 <html lang="en">
   <head>
     <meta charset="UTF-8" />
     <link rel="icon" type="image/svg+xml" href="/vite.svg" />
     <meta name="viewport" content="width=device-width, initial-scale=1.0" />
     <title>ChatGpt</title>
     <script type="module" src="/main.js" defer></script>
   </head>
   <style>
     body{
       width: 100vw;
       display: flex;
       flex-direction: column;
       align-items: center;
       justify-content: center;
     }
     #app{
       width: 30%;
     }
     #app>*{
       width: 100%;
       margin-bottom: 20px;
     }
     textarea{
       height: 100px;
     }
     #answer{
       height: 300px;
     }
   </style>
   <body>
     <div id="app">
       <h2>OpenAI ChatGpt Clone</h2>
       <textarea id="prompt" placeholder="Enter the prompt..." ></textarea>
       <button id="submit-btn">Submit</button>
       <h3>Solution:</h3>
       <textarea id="answer" placeholder="Your solutions will come here"></textarea>
     </div>
   </body>
 </html>
Write the Javascript required for frontend
We have added a click event listener to the 'submit' button. When the user clicks on the submit button, we will make a POST request to our backend on the endpoint /chat. In the request body of the POST request, we will be sending the prompt that the user has entered.
And when the response arrives from the backend, we will show it to the user.
 const prompt = document.querySelector('#prompt')
 const submitBtn = document.querySelector('#submit-btn')
 const answer = document.querySelector('#answer')

 submitBtn.addEventListener('click',()=>{
   answer.value = "getting the response from server, wait few seconds"
   fetch('http://localhost:5050/chat',{
     method:'POST',
     headers:{'Content-Type':'application/json'},
     body:JSON.stringify({prompt:prompt.value})
   })
   .then(res=>res.json())
   .then(data=>{
     if(data.status=='ok'){
       answer.value=data.data
     }else{
       answer.value="Some Error Occured"
     }
   })
   .catch(err=>{
     answer.value="Some Error Occured"
   })

 })
Backend
Initialize a backend using npm
npm initInstall the packages that are required
Apart from trivial packages like express,nodemon , cors and dotenv we will also have to install OpenAI's package called openai.
npm i express nodemon cors dotenv openaiMake an index.js file and write the backend code in it
The main thing that we have to do in the backend is to initialize an OpenAIApi object. For that, we will have to make an object of Configuration provided on openai package that we installed in the previous step.
import express from 'express';
import cors from 'cors';
import * as dotenv from 'dotenv'
import { Configuration, OpenAIApi } from "openai";


const app = express()
const PORT = process.env.PORT || 5050
app.use(express.json())
app.use(cors())
dotenv.config()

//make a configuration object by providing the your organizationID and API key that you can get from your profile after making account with OpenAI
const configuration = new Configuration({
    organization: process.env.ORGANIZATION_ID,
    apiKey: process.env.API_KEY,
});
// now initialize the
const openai = new OpenAIApi(configuration);


app.get('/',(req,res)=>{
    res.status(200).send("OpenAI api demo")
})

// when our /chat endpoint is hit, we make a API call to OpenAI servers
app.post('/chat',async (req,res)=>{
    const response = await openai.createCompletion(
        {
          "model": "text-davinci-003",
          "prompt": req.body.prompt,
          "max_tokens": 2000,
        }
    );
    const data = response.data.choices[0].text

    res.status(200).send({status:'ok',data})
})

app.listen(PORT,()=>{
    console.log("Listening on",PORT)
})
When our /chat endpoint is hit, we make an API call to OpenAI servers. In the API call, we will have to specify which model we want to use, the prompt (that we get in the request body), and the max_tokens size that we want to get from OpenAI.
For Our purpose, we are going to use the text-davinci-003 model, which is a ChatGpt model capable of doing any task. Once we get the response from the OpenAI we will extract the solution from the JSON object that we get in response variable and send it back to the frontend. Then the solution to our prompt will be shown in the frontend.
References:
Openai npm package: https://www.npmjs.com/package/openai
GPT-3 model: https://platform.openai.com/docs/models/gpt-3
API reference: https://platform.openai.com/docs/api-reference/completions/create
The whole code is available on my Github

