

Making a Simple Ping Pong Game in Javascript using Phaser [No Phaser experience required]
![Making a Simple Ping Pong Game in Javascript using Phaser [No Phaser experience required]](/_next/image?url=https%3A%2F%2Fcdn.hashnode.com%2Fres%2Fhashnode%2Fimage%2Fupload%2Fv1681564431389%2Fbbb94e89-7cde-4988-92ab-02fbd5a9b6aa.png&w=3840&q=75)
I am a full-stack developer. Building with Go, Typescript, React, Node, PostgreSQL, MongoDB. Here to share my knowledge and journey
Overview
Have you ever wanted to create your own simple game, but didn't know where to start? We create a simple paddle and ball game using Phaser.
The rule for the game will be to not let the ball fall on the ground using a paddle. Although there is a catch, the ball will increase its speed linearly, making it harder and harder for the player to control it.
Game Demo: https://ping-pong-phaser-demo.netlify.app/
Github: https://github.com/yashnirmal/ping-pong-hashnode-demo
What is PhaserJS
PhaserJS is a free and open-source JavaScript game development framework that's easy to use and perfect for creating 2D games.
It makes it much easier to make games using javascript since it already provides a comprehensive set of tools and features for developing games, including asset management, physics engines, audio and input handling, and more.
Using this we can also create cross-platform games that can be played on desktops, laptops, tablets, and mobile devices.
As complex as it may sound, it is very beginner friendly and we are going to use this for this tutorial.
Steps
Create a Vite project
We will be using Vite's VanillaJs template for the Ping Pong Game. For that, we have to run this command
npm create vite@latest ping-pong-game --template vanillaAfter the template is created, we will have to install the Vite dependencies, so first go inside the project folder and then install them.
 cd ping-pong-game
 npm i
This installs all the necessary Vite dependencies. You can also check if the project is working by running
npm run devand going to the specified
localhostserver inside your browser.Install Phaser
Now we have to install PhaserJs inside the project. We can do that using the following command.
npm i phaserAfter this, the
package.jsonfile should look like this{ "name": "3-ping-pong-game", "private": true, "version": "0.0.0", "type": "module", "scripts": { "dev": "vite", "build": "vite build", "preview": "vite preview" }, "devDependencies": { "vite": "^4.2.0" }, "dependencies": { "phaser": "^3.60.0" } }Clean up the Vite Template
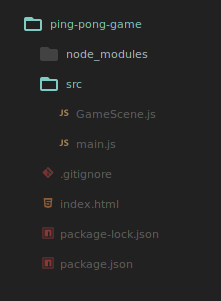
So far now, we created a Vite project using the Vite template and installed PahserJs inside it. But the Vite template contains some files that we don't need. So we are going to clean up the template to make the project structure look like this
index.html file
The index.html file will be very simple and have basic styling(mainly to center our canvas element)
 <!DOCTYPE html>
 <html lang="en">
 <head>
     <meta charset="UTF-8">
     <meta name="viewport" content="width=device-width, initial-scale=1.0">
     <title>Phaser Game</title>
     <!-- Import the main js file, set type to 'module', this allow us to use 'import' statements in code -->
     <script src="./src/main.js" type="module" defer></script>
 </head>
 <style>
     /*    Basic styling */
     *{
         padding:0;
         margin:0;
         box-sizing: border-box;
     }
     body{
         width:100vw;
         height: 100vh;
         border: 2px solid black;
         overflow: hidden;
         display: flex;
         justify-content: center;
         align-items: center;
         background-color: #252525;
     }
     /*    The game that we create using Phaerjs is rendered on a canvas element, so we are giving it some style, to make it look better*/
     canvas{
         border: 2px solid white;
     }
 </style>
 <body>

 </body>
 </html>
main.js
We will have two files Javascript files,
main.jsandGameScene.js.main.jsis responsible for initializing the game and starting the game scene, whileGameScene.jscontains the code for the actual game.In
main.js, we start by importing Phaser and ourGameSceneclass(Which we will make in the next step). We then create anconfigobject, thisconfigobject helps us to set the different properties of the game, like width and height, background color, etc.In our
configobject we set the width and height of the game screen(which is a canvas element that Phase automatically adds and renders in our HTML. All the things happening in our game is rendered on this canvas element), the background color, and the physics engine to use.We then create a new
Phaser.Gameobject with ourconfigobject and add ourGameSceneto the game and start theGameScene.import Phaser from 'phaser' const config = { width: 800, height: 500, type:Phaser.AUTO, // automatically choose the best renderer backgroundColor:'#5D3FD3', /* we will use the Arcade Physics system, which is a lightweight 2D physics engine that comes with Phaser. The gravity property is set to { y: 0 }, which means there is no gravity in the game. If you want gravity to be enabled, you can change the value of the y property to a positive number, like { y: 500 }. */ physics :{ default:'arcade', arcade:{ gravity:{ y:0 }, // debug is set to true, so it is easy for us to visualiza the physics of the game // in prodcution, comment it out debug:true } } } var game = new Phaser.Game(config)This will create a game screen of properties that are specified in the
configobject. You can check if the game screen is created on yourlocalhostserver.GameScene.js
Now that our game screen is created we have to render our game on this screen. For that, we will be using something called
Scenein Phaser. In Phaser, aSceneis a self-contained game module that has its own set of properties, methods, and assets, and can be added or removed from the game as needed.In simple words, you can say a
Sceneis basically, what you see on the game screen. You can have different Scenes in Phaser, like a Title Scene which be loaded when the game is first loaded and show you "welcome to the game", we can also have, like in our case, a Game Scene, which will show you the game. We can also have different scenes for different levels of the Game.Code of our
GameScene.js```javascript
import Phaser from 'phaser'
export default class GameScene extends Phaser.Scene{
constructor(){ super() this.score = 0 this.speedControl = 0 }
/ When a scene is loaded, the create() function is called once, and everything that we add to the scene in this function will stay in the scene until we explicitly remove it. / create(){
// create a circle 400 unit from left and 100 unit from top of // the ball has color #ffffff(white) and opacity 1 this.ball = this.add.circle(400,100,10,0xffffff,1) // adding the physic that we created in game config objec tot ball this.physics.add.existing(this.ball) // settin the bounce in x and y direction this.ball.body.setBounce(1,1) // below line is added, to make the ball bounce off the world(game screen) this.ball.body.setCollideWorldBounds(true,1,1) // giving velocity of 200 and 200 in both x and y direction this.ball.body.setVelocity(200,200)
// adding tha paddle at 400 units from left and 450 from top // with width of 200 and 20 height // color is #ffffff(white) and opacity is 1 this.paddle = this.add.rectangle(400,450,200,20,0xffffff,1) // we are adding the physics to paddle but the static(2nd argument) is set to true, so our paddle won't move automatically this.physics.add.existing(this.paddle,true) // enabling collision between paddle and ball this.physics.add.collider(this.paddle,this.ball)
// it creates an object containing four properties: up, down, left, and right, that correspond to the arrow keys on a keyboard. // we are storing the object in 'cursors' this.cursors = this.input.keyboard.createCursorKeys()
// adding text in the scene, that will show score // its added is position 10 from left and 10 from top this.scoreText = this.add.text(10,10,"Score : "+this.score) }
/ The update() function in a Phaser scene is called every frame of the game loop, usually 60 times per second, It is used to update the position of the elements present in the scene, like ball in our case / update(){
// checking if the user pressed left key if(this.cursors.left.isDown){ this.paddle.x -= 10 // moving paddle to10 units left this.paddle.body.updateFromGameObject() //updating the physics body of a paddle to match its current position } else if (this.cursors.right.isDown){ // checking if the user pressed right key this.paddle.x += 10 this.paddle.body.updateFromGameObject() }
//do game over if the ball touches the bottom surface if(this.ball.y+this.ball.radius>=500){ // stopping the ball and showing alert this.ball.body.setVelocity(0,0) alert("Game Over!!! Your Score : "+this.score)
// after user interact with alert // score becomes zero and its position and velocity is reset this.score=0 this.ball.setPosition(400,100) this.ball.body.setVelocity(200,200) }
// updating the speedcontrol every time update is run and rendering the score this.speedControl +=1 this.scoreText.text = "Score : "+this.score
// rememer the update function is run about 60 times a second
// and we don't want to increase the score this fast
// so we make a condition that everytime speedcontrol become a multiple of 100 we update the score
// this makes the code inside the if condition run 100 time slower that the update
// you can change 100 with a number you like, to make the code inside if run faster or slower
if(this.speedControl%100===0){
// increase the score
this.score+=1
// increasing the ball velocity in y direction by little, to make the game more challenging
const vel = this.ball.body.velocity
this.ball.body.setVelocityY(vel.y*1.05)
}
}
}
7. ### Rendering the GameScene on the Game screen

    To render the GameScene on the game screen, import it in the `main.js` file and start it using the following updated `main.js`

    Updated `main.js` 👇

    ```javascript
    import Phaser from 'phaser'
    import GameScene from "./GameScene"


    const config = {
        ...
    }

    var game = new Phaser.Game(config)

    //adding the GameScene to game
    // also giving it a unique name called 'game-scene' to identify it
    // we can use this unique name('game-scene') to reference GameScene in future
    game.scene.add('game-scene',GameScene)

    // starting the game-scene
    game.scene.start('game-scene')
Woo hoo! Our game is ready🥳
Let's run the game
As I said earlier you can run the game using the following command. This will start the game in localhost server
npm run devLet's build the game for deployment
You can use the following command for building the game and then you can deploy it on any cloud-based deployment service. I am using Netlify for this
npm run build
Resources
Github link to the repo
Phaser3 Docs
This tutorial is based on the YT playlist
Conclusion
We have built a very simple Ping Pong game. Comment down your suggestions and like the blog for better reach.
Thank you for being till the end and check out other interesting blogs by me here: https://yashnirmal.hashnode.dev/


